목차
<title>유니티 코딩 중 메모</title>
StringBuilder
using System.Text;

private StringBuilder mSbFPS = new StringBuilder( 256 );

// 스트링 만들기
{
  mSbFPS.Remove( 0, mSbFPS.Length );
  // 특정 format에 맞춰 스트링 빌드
  mSbFPS.AppendFormat( "{0:f2}\nm:{1:f2},x:{2:f2},v:{3}",
    fps, minFrames, maxFrames, (mFpsSum/mFpsSumCnt) );
}

UILabel mLabel; // UILabel을 설정한다.
// 최종 출력
mLabel.text = mSbFPS.ToString();
??????
- System.Serializable
2차원 Array를 Inspector에 보여주고 싶을때,
//[System.Serializable]가 없으면 인스펙터에 보이지 않았다.
[System.Serializable]
class SimpleAniData
{
  public Texture[] data;
};
[System.Serializable]
class SimpleAni :  : MonoBehaviour
{
  public SimpleAniData[] animationList;
  //
  // 아래방식도 보이지 않았었다.
  //public Texture[][] animationList;

}
객체를 멈춘 상태로 만들어 놓고, 시작할때 활성화 할때
GameObject를 비활성활 상태로 만들고 필요할때 활성화할때.
- Awake()에서
gameObject.SetActive(false);
로 비활성 상태로 만들고,
- 필요할때,
gameObject.SetActive(true)
호출해서 활성화한다.
그리고,
- Start()에서 활성 상태를 false로 바꿔 놓고 필요할때 활성상태로 바꿨는데.. 잘 안될때가 있었다. 왜 그럴까..
- SetActive(true)를 호출할때는, 다른 코드가 실행 되기 전에 먼저 활성 상태로 바꿨다.
C# 사용시
new 할당이 필요한 인스턴스의 초기화는 Start()에서
- new 할당이 필요한 변수 타입의 경우, 선언시 바로 new 할당을 하는 경우, NullException 의 원인이 된다.
- 이럴 때는 선언은 그대로 두고, Start() 함수에서 new 할당을 하면 에러가 사라진다.
중첩 클래스의 public 변수가 인스펙터에 나오게 하려면
중첩된 클래스에 [System.Serializable]가 클래스 선언 위부분에 추가 되어야, 제대로 인식한다.
아래 예제처럼 되어야, 인스펙터에 Menu를 선택했을 때, firstMenu 클래스의 menuName이 제대로 나온다.
public class Menu : MonoBehaviour {
  [System.Serializable]
  public class MenuItem {
    public string menuName;
  }

  public MenuItem firstMenu;
}
배열 또는 리스트 사용과 파라미터 전달
List로 만든 배열을 (어떤타입)[] 과 같은 형태의 파라미터로 넘겨야 할때.
List<GUIContent> itemContent = new List<GUIContent>();
itemContent.Add( new GUIContent(..) );
// 몇개 더 만들었다고 설정하고,
// GUI.SelectionGrid() 함수 같은 곳에 GUIContent[] 배열 타입의 값을 파라미터로 넘겨줘야 할때
GUI.SelectionGrid( ... itemContent.ToArray() ... );
인스펙터에서 값을 입력하는 자동 증가되는 배열 타입의 변수을 선언
public UserItem[] a_items;
이렇게 선언만 해둬도, 인스펙터에 표시도 되고 값도 입력해서 사용할 수 있었다.
uv 좌표 입력 순서
평면 메시에 (스프라이트 용도의) 텍스쳐 입힐때.. 이게 맞나? 잘 모르겠네.
float _l = 1.0f/texWidth * spriteTopLeft.x;
float _t = 1.0f/texHeight * spriteTopLeft.y;
float _r = 1.0f/texWidth * (spriteSize.x - spriteTopLeft.x);
float _b = 1.0f/texHeight * (spriteSize.y - spriteTopLeft.y);

_mesh.uv = new Vector2[]
{
	new Vector2( _l, _t ),
	new Vector2( _l, _b ),
	new Vector2( _r, _t ),
	new Vector2( _r, _b )
};
Physical Material
- ?
코루틴 (CoRoutine)
- 일정 시간 대기하는 작업을 프레임마다 시간을 체크할 필요 없이 구현 가능.
- 코루틴에서 설정한 함수는 별도 쓰레드처럼 동작.
- Update()보다 효율적으로 동작한다고 하니, 자주 활용하라는 팁
void Start() {
  StartCoroutine( sampleCoroutine() );
}
IEnumerator sampleCoroutine() {
  // 어쩌구 저쩌구
  //...
  yield return new WaitForSeconds( 1.0f / 24f ); // WaitForSeconds()는 소수점도 받나보구만.
}
코루틴 클래스
- WaitForSeconds : 지정한 초만큼 대기
- WaitForFixedUpdate : FixedUpdate 구문 수행이 완료될때까지 대기
- WWW : 웹에서 데이터 전송이 완료 될때까지 대기
- AsyncOperation : LoadLevelsAsync 같은 비동기 작업이 완료될때까지 대기
- WaitForEndOfFrame : 현재 프레임 렌더링이 끝날때까지 대기
- null : Update 구문 수행이 완료 될때까지 대기(현재 오브젝트의 Update인가??)
애니메이션 이징 (Tween or Easing)
이징 공식
- Back : 화살 당기듯, 잠시 뒤로 후퇴했다가 이동.
- Circle : 원 함수 공식에 의해 이동
- Cubic : 3차 함수 공식에 의해 이동…
- Exponential : 지수 함수 공식에 의해 이동.
- Sine : 사인 함수를 사용해서 큰 변화 없이 부드럽게 이동.
- Quadratic : 2차 함수 공식에 의해 이동. 변화폭이 적다.
- Quartic : 4차 함수 공식에 의해 이동. Cubic보다 변화폭이 높다.
- Quintic : 5차 함수 공식에 의해 이동 (헉? 뭐지?)
- Linear : 일정한 움직임.
- Bound : 공이 탄성을 받아 튀는 모습으로 이동
- Elastic : 점점 커지는 진동의 움직임을 따라 이동 (용수철같은)
공식의 적용 모드
- EaseIn : 연산 그대로 적용
- EaseOut : 연산을 반대로 적용
- EaseInOut : 시작~중간까지는 그대로 중간~끝부분은 반대로 적용.

각 움직임에 대한 라이브 데모
IIS
IIS는 mime 등록이 안되어 있으면 다운로드가 되지 않으니, iis 웹 설정에 “.unity3d”에 대한 mime를 추가해야 한다.
Awake vs Start
- Start는 오브젝트가 enable 되어 있을때 호출되고, Awake는 항상 호출 된다.
- Awake 는 Start 보다 먼저 실행된다.
오브젝트 transform 복사
더 좋은 방법 없나..
GameObj_1.transform.position = GameObj_2.transform.position;
GameObj_1.transform.transform = GameObj_2.transform.transform;
오브젝트 선택 or 컴포넌트 선택
다른 게임 오브젝트의 컴포넌트나 스크립트 사용
public class example : MonoBehaviour {
  void Example() {
    transform.Translate(0, 1, 0);
    GetComponent<Transform>().Translate(0, 1, 0);
  }
}

public class example : MonoBehaviour {
  void Update() {
    OtherScript otherScript = GetComponent<OtherScript>();
    otherScript.DoSomething();
  }
}
게임 오브젝트 찾기
- 찾기 귀찮으면 스크립트에서 게임 오브젝트를 파라미터로 받는 방법이 편한듯.
public class example : MonoBehaviour {
  void Start() {
    GameObject go = GameObject.Find("SomeGuy");
    go.GetComponent<OtherScript>().DoSomething();
    GameObject player = GameObject.FindWithTag("Player");
    player.GetComponent<OtherScript>().DoSomething();
  }
}
iTween : Path를 사용한 이동 기능
임의의 오브젝트를 Path를 따라 움직이게 만든다. 움직이는 방향은 궤도 회전 방식.
- 패쓰로 사용할 빈 오브젝트를 , 생각한 경로 대로 만든다.
- 패스가 눈에 보이도록 OnDrawGizmos()에서 그려지는 스크립트를 추가한다.
// 이런 식으로..
void OnDrawGizmos() {
  Gizmos.DrawWireSphere(transform.position,.25f);
}
- 움직이려는 오브젝트에 아래와 같은 스크립트를 추가해서, 패쓰를 따라 오브젝트가 움직이게 한다. _path에 미리 만들어 놓은 빈 오브젝트를 차례대로 추가해서 경로를 완성한다.
public Transform[] _path;
void OnDrawGizmos() { iTween.DrawPath(path); }
// iTween의 Path 파라미터에 _path를 추가해서 이 경로 만큼 이동하게 한다.
void Start() {
  iTween.MoveTo( gameObject,
    iTween.Hash(
      "path",_path,
      "time",1,
      "easetype",iTween.EaseType.linear,
      "looptype",iTween.LoopType.loop,
      "movetopath",false)
  );
}
iTween : 회전 샘플
랜덤한 회전과, 각 tween 방식을 확인하기 위한 샘플 코드
public class cubeTexture : MonoBehaviour
{
public float tweenTime = 3f;
// 인스펙터에서 직접 정하고 싶으면 코멘트 삭제
//public iTween.EaseType easeType = iTween.EaseType.easeOutExpo;

void Start ()
{
// tween 움직임을 랜덤하게 선택
iTween.EaseType _easytype = (iTween.EaseType)Random.Range( 0, 31 );
// 랜덤 로테이션으로 무작위 회전값을 얻고,
// "oncomplete" 옵션을 추가해서, 움직임이 끝나면 새로운 움직임을 새로 추가
iTween.RotateTo( gameObject,
  iTween.Hash(
    "rotation", Random.rotation.eulerAngles,
    "time", tweenTime,
    "oncomplete","rotateTest",
    "easeType",_easytype ));
}

public void rotateTest()
{
iTween.EaseType _easytype = (iTween.EaseType)Random.Range( 0, 31 );
  iTween.RotateTo( gameObject,
    iTween.Hash(
      "rotation", Random.rotation.eulerAngles,
      "time", tweenTime,
      "oncomplete","rotateTest",
      "easeType",_easytype ));
}
}
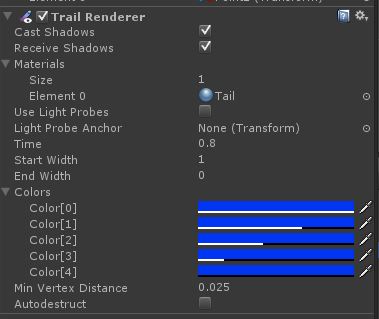
꼬리 효과(Trail)
Trail Renderer
- 이걸 사용하면, 꼬리가 있는 잔상효과를 만들 수 있다. 따로 만들지 않아도 되는구나..
- 실용적인 예시. 파란색 꼬리가 남게 설정하는 부분.

일단
Gizmo를 활용해서 EmptyObject
- EmptyObject 만들고 화면에 표시하게 하는 방법
void OnDrawGizmos() {
  Gizmos.DrawWireSphere(transform.position,.25f);
}
OnDrawGizmos
- OnDrawGizmos()를 사용하면 렌더링 하기 전에 Scene에서 그려지는 것을 볼 수 있다.
- 정확한 사용법은 아직 잘 모르겠다.
Trigger, Collision
is trigger가 켜서 OnTriggerEnter() 함수를 만들어 두면 충돌 되었을때에 뭔가 할 수 있지만, 충돌 처리는 무시된다.
Collider.OnCollisionEnter()를 사용하면 충돌된 시점에 충돌 효과는 계속 처리하면서 뭔가 할 수 있다.
public class SampleObject : MonoBehaviour
{
protected bool isFirstCollision = true;
void OnCollisionEnter( Collision other_ ) {
  // 첫번째 충돌에서.. 뭔가 하는 경우.
	if( isFirstCollision == true ) {
		Debug.Log( "ta" + other_.gameObject.name );
		isFirstCollision = false;
	}
}
}
레퍼런스